

Site Launch Checklist
This document outlines our recommended steps for launching a BigCommerce for WordPress site. It assumes that you have a reasonable understanding of WordPress and BigCommerce and know how to install the BigCommerce for WordPress plugin. For an overview of BigCommerce and the BigCommerce for WordPress plugin, see the following articles:
- BigCommerce Overview
- Store profile
- Taxes
- Shipping
- Payment methods
- BigCommerce for WordPress Overview
Required steps
Set up WordPress host to meet recommended server requirements
While you can use BigCommerce for WordPress on a vast majority of WordPress hosts, it is best to use stable versions of PHP, MySQL, and WordPress to ensure the most performant, secure experience.
Server requirements:
- PHP: 7.3+
- The PHP intl extension is recommended to enable better currency formatting
- MySQL: 5.6+
- WordPress: 5.3+
- SSL
Connect BigCommerce for WordPress to BigCommerce using API credentials
BigCommerce for WordPress connects to the BigCommerce API with a set of API credentials. These credentials are for a single BigCommerce app. For production sites, you will need to create a separate set of API credentials to ensure proper rate limits are applied.
A separate set of API credentials is required if you want more than one WordPress channel configured in your account, as using the standard connect to BC flow in the plugin will disconnect previous app connections from your other sites. For instructions on how to create additional API credentials, see Multi-site Setup.
API credentials can be set using constants in the site’s wp-config.php file, as shown below. Values set in wp-config.php will override options in the database.
Setting API credentials in wp-config.php file:
Configure BigCommerce for WordPress product sync
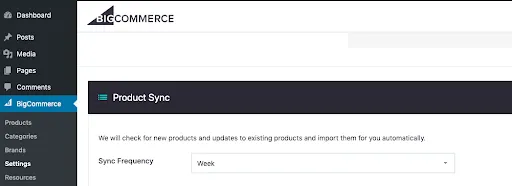
The product sync occurs every 5 minutes, by default. All newly-added BigCommerce products will be automatically listed on the WordPress site.
These settings can be configured to match business requirements. The frequency of new products being added and whether all of the catalog should be for sale online determines the correct settings.
The plugin uses the standard WP-Cron system, which needs traffic to run. If you would like to process regardless of site visitors, we recommend setting a cron job on the server to force processing. For information on how to use the system task scheduler for WP-Cron, see the Plugin Handbook.
Product, inventory, and checkout webhook events are automatically set up when the plugin is installed. Their actions in BigCommerce will automatically trigger a future partial sync for only the affected products.
Select cart type
Within BigCommerce for WordPress, there are multiple ways to configure how the cart interactions work. Take the time to select the right experience from the following:
Mini-cart
- Keep the shopper on the page after they have added an item.
- When the cart menu item is clicked, show a mini-cart overview as an overlay on the page, which details the items, total, and links to view cart or checkout.
- Available as a widget to build into other parts of the template (for example, to display a persistent, dynamic sidebar cart).
Ajax add-to-cart
- Keep the shopper on the page after they have added an item.
- When the cart menu item is clicked, navigate to the cart page.
Redirect to cart
- When the shopper adds an item to the cart, navigate to the cart page.
Select checkout type
The checkout type determines which payment methods and checkout customizations are available to the site.
Embedded Checkout creates a deeply integrated experience, where the user stays on the WordPress site. However, this checkout type does not support many payment methods. For example, Embedded Checkout cannot be used with hosted wallets, such as Amazon Pay.
Redirected Checkout unlocks the full checkout experience of BigCommerce, including hosted wallets and ability to customize the checkout layout through the Stencil framework and Checkout SDK. To make the hand off from WordPress to BigCommerce seamless, set up a subdomain such as checkout.your-domain.com. For details on how to change your store domain, see Changing Domains.
Note that in either case, the links within checkout, such as Register Account and Edit Cart, will be automatically set by the plugin to link back to the correct pages on the WordPress site using the Sites and Routes API.
Enable user registration on WordPress
For BigCommerce for WordPress to handle registration of new customers, membership of new users needs to be enabled on the WordPress site. You can enable this in the Settings > General section of the WordPress admin by turning on Anyone can register for the Membership option.
Ensure dynamic pages are not cached
Customer specific pages such as Cart, My Account, and Checkout should not be cached by any plugins or the WordPress host.
Customize the layout and color scheme
Once you install BigCommerce for WordPress, you can access the BigCommerce section inside the WordPress Customizer. There you can customize the following areas of your theme:
Buttons
- Add to Cart button label
- Pre-Order Add to Cart button label
- Buy Now button label
- Pre-Order Now button label
- Choose Options button label
- View Product button label
Colors and theme
- Use plugin CSS or disable built-in styles
- Button color
- Button text color
- Sale price color
- Sale icon text color
- Product availability color
- Production condition color
- Product condition color
Product single
- Related products to display
- Default product image
- Control how default prices display while waiting for Pricing API responses
- Inventory display logic
Product catalog
- Catalog page title
- Catalog page slug
- Catalog page description
- Enabled sorting options
- Featured
- Newest
- Best selling
- Product title A–Z
- Product title Z–A
- Reviews
- Price (low to high)
- Price (high to low)
- Filters
- Categories
- Brands
- Columns in product grid
- Products per page
- Whether quick view is enabled or not
Cart
- Enable mini-cart or not
Embedded checkout
- Background color
- Text color
- Link color
- Error color
Optional steps
Create a staging WordPress instance
To set up a staging site on WordPress without affecting the main site, you need to set up an additional channel for the staging site. This will ensure you can test the shopper experience end-to-end with all the URLs linking back to the staging instance and an independent set of products listed.
You can do this by installing BigCommerce for WordPress on a second WordPress site using the API credentials connection method and choosing to create a new channel during the setup process.
Hide WordPress admin bar for customers
The default setup of WordPress shows an admin bar at the top of every page for every logged in user. It provides a link back to the main site, the user’s name, and the ability to log out. This is reasonable for sites that are mainly content and might have additional custom actions in the bar, but for commerce-focused sites you may want to hide it.
For a BigCommerce for WordPress child plugin that hides the bar for customers, see BC4WP plugin.
Stop unnecessary webhooks
BigCommerce contains a number of webhooks that your site may benefit from. We recommend disabling unused webhooks to enhance performance. To disable the webhooks you do not need, use the Webhooks API and update the is_active fields to false.
Because webhooks are associated by client ID, make sure you are using BigCommerce for WordPress API credentials to make these Webhook API calls.
Connect multiple channels into BigCommerce for WordPress
More than one channel can be connected to BigCommerce for WordPress to drive multi-region and other complex shopper experiences. For example, you can set up channels for US, FR, and UK regions that reference different names, descriptions, and price lists for each, and then have them activate when certain subdirectories are accessed. Alternatively, you can have a B2B channel that activates only when someone has a certain cookie set.
This requires activation of the multi-channel mode, which is a one-line command you add to your WordPress code, and some customization to tell WordPress when to use each channel.
Multi-channel mode:
For more details on how to build a multi-region storefront with BigCommerce for WordPress, see Building a Multi-Region Storefront.
CLI setup instructions
The import process will run faster and more reliably if run from the command line.
-
Ensure that your host has WP-CLI installed and configured to manage your WordPress site.
-
The initial import will likely take longer than subsequent imports. Run the following command for the first import:
wp bigcommerce import products -
Set up a system cron job to run the import at your desired frequency. For example, to run every 10 minutes:
*/10 * * * * /usr/bin/wp bigcommerce import products --quiet > /dev/null 2>&1
This does not disable the WordPress cron-based import process. As long as the CLI import runs more frequently than the import configured on the settings screen, the cron-based import should never be triggered. In the event that both are running concurrently, safeguards are in place to ensure that only one process runs at a time.
Subsequent imports will only update products that have changed since the last import. To force an update on all products, add the --force flag to the import command:
wp bigcommerce import products --force
Set up and recommendations for cron
WordPress sites will generally operate more efficiently if WordPress’s default cron is disabled and replaced with a server-side cron job.
To disable WordPress’s default cron, follow these steps:
- Disable WP-cron.
- Set a constant in
your wp-config.php:
- Enable WP cron events.
- Set up a system cron job to run WordPress’s cron events from the command line:
Running the job every minute is generally recommended.
Details on how to debug
If the site is not importing as expected, enable diagnostic logging to produce a detailed log of the import process.
After the next import has run, click Get Diagnostics to display data from the logs.
If running an import from the command line, add the --debug flag to get additional information as the import runs, including API error messages.
wp bigcommerce import products --debug
If network latency is causing your API requests to timeout, the timeout duration can be increased with a filter:
Expectations for performance
The duration of the import process depends on a number of factors, including network latency, system load, number of products, and the volatility of the catalog.
For an initial import, one can presume roughly 1-2 seconds per product. A catalog of 30 products may take around a minute to import, whereas 10,000 products may take several hours.
Subsequent imports only update products that have changed in some way. This can reduce the overall processing time to less than a second per product, which includes some overhead to determine which products have changed.
It is important to note changes that will cause a product to be updated:
- Changes to the title, description, categories, price, etc. in the BigCommerce control panel.
- Sales of the product, which change the
"total_sold"property. - New product reviews.
- Changes in inventory level, including variants.
Hosting specs
The BigCommerce for WordPress plugin should be able to run in any environment supported by the current version of WordPress:
- PHP: 5.6.20+, but 7.3+ recommended.
- MySQL: 5.6+
- WordPress: the current major release (5.3.x) or the prior two major versions (5.1+). WordPress considers the first two sequences when identifying a “major” version.
- SSL is required for OAuth and Embedded Checkout.
Extend BigCommerce with compatible plugins
There is a growing list of plugins that support BigCommerce either through added support to their core plugin or additional child plugins. This enables you to add more complex functionality like faceted search without coding it yourself.