Integrating Google Pay direct pay with your custom checkout
Google Pay direct pay is a single-click variant of the Google Pay payment flow. Instead of the shopper selecting Google Pay, clicking Sign in to Google Pay to open the payment sheet, and then clicking Place Order to submit, the direct-pay flow renders a branded Google Pay button in place of the Place Order button. Clicking the button opens the Google Pay payment sheet and — on success — submits the order and redirects to the confirmation page in one step.
Stores using checkout-js v1.812.1 or higher support Google Pay direct pay out of the box once the feature is enabled for the store. If your store uses a custom checkout built on top of checkout-sdk-js, you will need to integrate direct pay by following the instructions in this article.
Requirements
Google Pay direct pay is available to any store that already supports Google Pay. Check Guide to Alternative Payment Methods: Google Pay for a list of compatible payment gateways.
Before following the integration steps, ensure your custom checkout project is using the checkout-sdk v1.921.0 or higher. We recommend reviewing the README file to familiarize yourself with checkout service usage.
Direct pay is gated by a server-side feature flag named PI-5111.google_pay_direct_pay_on_click. The flag is delivered alongside the rest of the store config in the checkout-settings request.
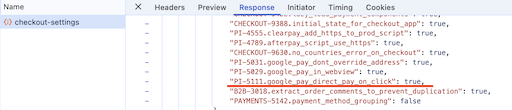 If
If isDirectPayEnabled is false, continue using the standard Google Pay wallet-button flow. The rest of this article describes what to render when the flag is true.
Direct pay must only be activated when the shopper selects Google Pay in the payment-step accordion. If the shopper already chose Google Pay upstream — for example, by clicking the Google Pay button on the cart page, product detail page, or customer step — they have already interacted with the Google Pay payment sheet, and showing the direct-pay button would force them to do so a second time. See Step 1 below.
Configuring direct pay in the payment step
Step 1: Detect whether Google Pay was pre-selected
When your payment-step component mounts, capture whether Google Pay is already the active payment method on the checkout. If it is, fall back to the standard wallet-button flow instead of direct pay.
Save isPaymentSelectedAtMount in a ref (or equivalent stable variable) so subsequent re-renders do not change the rendered flow mid-session.
See the Checkout JS repository for an example of how GooglePayPaymentMethod.tsx uses a useRef to capture this value at mount.
Step 2: Decide which component to render
Combine the feature flag from above with the pre-selection guard:
Step 3: Render the Google Pay button container
The direct-pay button is rendered into a DOM element that you provide. In the default checkout, the existing Place Order button slot — element ID checkout-payment-continue — is reused so the Google Pay button visually replaces it. You can use the same ID or pick your own.
Step 4: Hide the Place Order button
When the direct-pay flow is active, the standard Place Order button must not be visible — the Google Pay button takes its place. Hide it before initializing the payment.
Remember to restore it (hidePaymentSubmitButton(method, false)) when the direct-pay component unmounts — for example, when the shopper switches to a different payment method.
Step 5: Initialize the payment in container mode
Call checkoutService.initializePayment and pass the new container option on the Google Pay options object. When container is set, the SDK creates a branded Google Pay button via GooglePayPaymentsClient.createButton and inserts it into the container — there is no need to provide your own walletButton element.
The full option set for GooglePayPaymentInitializeOptions in container mode:
Use the following code:
See the Checkout JS repository for an example of container-mode initialization.
Step 6: Handle the click, payment sheet, and order submission
Once the SDK has rendered the button, the entire flow — opening the Google Pay payment sheet, capturing the shopper’s payment method, submitting the order, and redirecting to /checkout/order-confirmation — is handled internally by GooglePayPaymentStrategy. You do not need to wire up checkoutService.submitOrder for the direct-pay flow.
If the shopper cancels the payment sheet, or if the order submission fails, the SDK re-loads the checkout state so the full list of payment methods becomes available again. The error is passed to your onError callback so you can display a message and allow the shopper to retry or pick another method.
Step 7: De-initialize the payment step
When the shopper switches to a different payment method, navigates back to a previous step, or otherwise unmounts the direct-pay component, call checkoutService.deinitializePayment and restore the Place Order button.
De-initialization removes the SDK-created button element from the container, releasing the slot so the Place Order button can be shown again.
Default payment step example
The image below depicts the Google Pay direct-pay button as it appears in the default checkout.
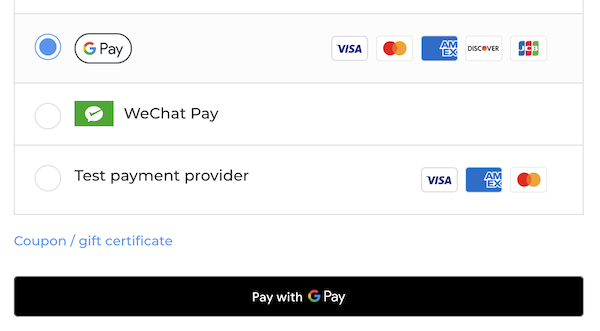
The payment step of checkout with Google Pay direct pay implemented
Falling back to the wallet-button flow
When isDirectPayEnabled is false, or when Google Pay was pre-selected upstream, continue using the existing wallet-button flow. In that flow:
- The shopper sees the Sign in to Google Pay button (rendered into the
walletButtonelement you provide). - After completing the Google Pay payment sheet, the shopper returns to the payment step with their payment details populated.
- The shopper clicks Place Order to submit.
This flow is unchanged by the direct-pay feature. See the Checkout JS repository for an example of how the same component branches between the two flows.
Resources
Source code
- Checkout JS repository (BigCommerce GitHub)
- Checkout SDK repository (BigCommerce GitHub)