

Using Custom Fonts and Icons
Custom fonts unavailable on Page Builder
- BigCommerce widgets come with a list of pre-defined fonts and do not support custom fonts at this time.
- Third-party widgets can support any font available in the theme. To learn more about third-party widgets, see Third-Party Widgets.
Applying custom fonts
There are two paths to take for using custom fonts. They are as follows:
- Change to a new Google Font
- Use a custom font
Google Fonts
Google Fonts are a collection of open-source fonts available for use. The base Cornerstone theme uses Karla and Montserrat. Google Fonts come included in the Cornerstone theme.
You can update the fonts in config.json; make sure to follow the Google_FontName_Weight format.
Check with your theme developer
If you are using a different theme, please check with the theme developer on using Google Fonts.
Custom fonts
Custom fonts can be used in any theme. To use a custom font upload it to the stores /content/ folder in WebDAV.
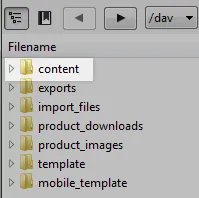
Reference fonts in head
Next, edit the appropriate template file’s <head> sections to reference your custom fonts. In this logo example, you would edit the templates/layout/base.html file’s <head> section to insert the following code (which references the custom font you just uploaded):
For all possible browser support use the following:
Update the CSS
Finally, update the appropriate CSS to reference the same font. In this example, you would edit the assets/scss/layouts/header/_header.scss file to change the header font.
CDN Handlebars
The CDN custom Handlebars helper assumes WebDAV’s default /content/ folder, so there is no need to specify that folder.
Fonts staged via WebDAV, as in the above example, will not show up in the local version of your theme.
Files that do not contain font-overriding CSS code will use the CSS settings in the config.json file.
Sass stylesheet support for theme fonts
To support Page Builder, your theme’s Sass stylesheet must call Stencil’s custom Sass functions to transform fonts specified in the theme’s config.json file. You must call these functions on each config.json font key whose value you want to make available to Sass variables.
The default Stencil theme includes these function calls in the following stylesheet
If your theme relies on a Sass framework other than Foundation, the relevant stylesheet will be a different SCSS file name within {theme-name}/assets/scss/.
How to enable fonts for Page Builder
Assume that your theme’s config.json contains the following key name and value (the details of both are arbitrary, but the key name must end in -font, and the value must follow a defined format):
In your Sass stylesheet, you would call the stencilFontFamily and stencilFontWeight custom Sass functions on the corresponding config.json key name like so:
These functions would extract the corresponding config.json values as:
This transformation allows you to use the $body-font-family and $body-font-weight variables wherever needed in your theme. If a merchant uses Theme Editor to select a different font family and/or weight, the variables will propagate the change throughout your theme.
Applying custom icons
Installing Grunt
Some of a Stencil theme’s static assets are handled with the Grunt JavaScript automator, where required. This means that you have some dependencies on both Grunt and npm. To get started:
First, make sure you have Grunt installed globally on your machine:
npm install -g grunt-cli
Then, from your theme’s root directory, run:
npm install
Calling theme icons
A Stencil theme’s icons are delivered via a single SVG sprite, which is embedded on the page in <theme-name>/templates/layout/base.html. This sprite is generated via the Grunt task grunt svgstore.
The task takes individual SVG files for each icon (in the theme’s assets/icons/ subdirectory) and bundles them together, to be inlined on the top of the theme, inside a Handlebars partial.
You can then call each icon in a similar way to an inline image via the following HTML:
<svg><use xlink:href="#icon-svgFileName" /></svg>
The ID of each SVG icon you call is based on the filename of the icon you want, with icon- prepended.
For example:
xlink:href="#icon-facebook"
Adding new icons
Simply add your new icon SVG file to the assets/icons/ folder. Then, from your theme’s root directory, run grunt svgstore or just grunt.