Integrate the BigCommerce API and Add a Database
Step 3: Integrate the BigCommerce API and Add a Database
Now that you have embedded your app in the BigCommerce platform, you’re ready to integrate the BigCommerce API.
Anytime you make an API call to BigCommerce, you need to pass in the access token. Storing the access token in a database allows you to persist the session when you call /auth, /load, or /uninstall endpoints.
This step demonstrates how to integrate the sample app with Cloud Firestore, a cloud-hosted NoSQLFirebase database, and MySQL, a relational database management system.
Install npm packages
If using Firebase, install firebase, jsonwebtoken, and swr npm packages.
If using MySQL, install mysql2, jsonwebtoken, and swr npm packages.
Firebase version
These instructions have been tested using the firebase v9 package. You can view a list of all the tested package versions in the package.json file on the Step 3 branch of this sample app’s repo.
Add scripts
-
Open
package.jsonin your text editor. -
Update the
scriptsproperty to include thedb:setupscript.
- Save your changes.
Add TypeScript definitions
-
In the root directory of your project, add a
typesfolder. -
In the
typesfolder, createauth.ts,db.ts, andindex.tsfiles. -
Open the
auth.tsfile and exportUser,SessionProps, andQueryParamsTypeScript type definitions. You can view auth.ts (GitHub).
- Open the
db.tsfile. ImportSessionPropsfrom./indexand exportStoreData,UserData, andDbTypeScript type definitions. You can view db.ts (GitHub).
- Open the
index.tsfile and export all interfaces. You can view index.ts (GitHub).
Ngrok expiration and callbacks
If ngrok stops working or your ngrok session expires, restart the tunnel to get the new {ngrok_url} and update the callback URLs in the Developer Portal and the AUTH_CALLBACK in the .env file.
Initialize React Context
React’s Context API is a state management tool that streamlines the process of passing data to multiple components at different nesting levels. It lets you pass data through the component tree without having to pass props through multiple levels of React components. To learn more about Context, see React’s Context guide.
-
In the root of your app, create a
contextfolder. -
In the
contextfolder, create asession.tsxfile. -
Add the logic to create a context. You can view session.tsx (GitHub).
Update environment variables
You use a JSON Web Token (JWT) to securely transmit information encoded as a JSON object between parties. To learn more about JWT, see the Internet Engineering Task Force documentation.
-
Open the
.envfile. -
Enter a JWT secret. Your JWT key should be at least 32 random characters (256 bits) for HS256.
JWT key length
The JWT key should be at least 32 random characters (256 bits) for HS256.
Update the auth lib page
-
In the
libfolder, open theauth.tsfile. -
At the top of the file, add the following imports:
- Below the import statements, add the following line of code to destructure environment variables from
.env:
- Remove the
process.envglobal variable from the BigCommerce instances.
- Remove the
QueryParamsinterface.
- Below the
bigcommerceSignedvariable, export thebigcommerceClientfunction.
- Export
getBCAuthandgetBCVerifyfunctions.
- Add the
setSession,getSession, andremoveDataStorefunctions.
- Add the
encodePayloadanddecodePayloadfunctions. You can view auth.ts (GitHub)
Add a database
In this section of the tutorial, we provide config and initialization code for both Firebase and MySQL databases. Depending on the database you choose to integrate your app with, use the configuration instructions specific to your setup.
For Firebase configuration instructions, see Set up Firebase database.
For MySQL configuration instructions, see Set up MySQL database.
Set up Firebase database
Cloud Firestore is a cloud-hosted NoSQL Firebase database built on Google’s infrastructure. To learn more about Firebase, including how-to guides and code samples, see Firebase Documentation. For a quickstart on how to set up your Cloud Firestore, see Get started.
Create a Firebase project
-
Sign in to Cloud Firestore using your Google account. To create a Google account, visit the Google signup page.
-
Once logged in, click Go to console in the top right corner.
-
In the Firebase console, click Add project.
-
Enter your project name and click Continue.
-
Click Create project.
Create a Firebase config
-
In your Firebase project console, click on the settings icon that resembles a gear in the top left corner.
-
Select Project settings from the dropdown menu.
-
Under the General tab, scroll down to Your apps and click on the code icon (
</>) to select the web platform. -
Type in the name of your app and click Register app.
-
Make a note of the Firebase
apiKey,authDomain, andprojectId. You will need that information to update the app’s environment variables.
Create a Cloud Firestore database
-
In your Firebase console, click Firestore Database under Build in the left pane. Follow the steps to create a Cloud Firestore database.
-
Click Create database.
-
Choose Start in test mode.
-
Select your Cloud Firestore location and click Enable.
Update environment variables
- In the
.envfile, specify the database type.
- Enter your Firebase database config keys.
Restart after adding environment variables
In the development mode, every time you modify your environment variables, make sure to restart the development server to capture the changes, using npm run dev.
Configure the Firebase database
-
In the
libfolder, create adbsfolder. -
In the
dbsfolder, create afirebase.tsfile. -
At the top of the file, import the Firebase packages and TypeScript definitions. You can view firebase.ts (GitHub).
- Add the Firebase config and initialization logic. You can view firebase.ts (GitHub)
- Running
firebase.initializeApp()will initialize the app. For initialized apps, callfirebase.app()to retrieve the Firebase app instance.
Set up MySQL database
MySQL is a relational database management system. For instructions on how to set up and use MySQL, see Getting Started with MySQL. Once you complete the database setup, make a note of the MySQL host, domain, username, password, and port variables. You will need them to update the app’s environment variables in the next step.
Update environment variables
- In the
.envfile, specify the database type.
- Enter your MySQL database config keys.
Restart dev server when .env changes
In the development mode, every time you modify your environment variables, make sure to restart the development server to capture the changes, using npm run dev.
Configure MySQL
-
In the
dbsfolder, create amysql.tsfile. -
At the top of the file, add the following imports:
- Add the MySQL config and initialization logic. You can view mysql.ts (GitHub).
Set up a db lib page
-
In the
libfolder, create adb.tsfile. -
Open the
db.tsfile and add the following imports at the top of the file.
- Add the switch expression to determine which database code to execute. You can view db.ts (GitHub).
Run the initial database migration
If you’re using MySQL, set up the initial tables by navigating to the root directory of your project and running the following script:
Upgrade the endpoints
Auth endpoint
-
Open the
auth.tsfile nested inside thepages/apifolder.- Import
encodePayload,getBCVerify, andsetSessionfrom/lib/auth. Your imports should now look like this:
- Import
- Update the logic to authenticate the app on install. You can view auth.ts (GitHub).
Load endpoint
-
Open the
load.tsfile nested inside thepages/apifolder. -
Import
encodePayload,getBCVerify, andsetSessionfrom/lib/auth. Your imports should now look like this:
- Update the logic to authenticate the app on load. You can view load.ts (GitHub).
Uninstall endpoint
-
Open the
uninstall.tsfile nested inside thepages/apifolder. -
Import
getBCVerifyandremoveSessionfrom/lib/auth. Your imports should now look like this:
- Update the logic to delete the session at time of uninstall. You can view uninstall.ts (GitHub).
Add the Products endpoint
The Products endpoint retrieves your products summary from the Catalog API.
-
In the
pages/apifolder, create a new folder calledproducts. -
In the
productsfolder, create anindex.tsfile. This will create a/productsroute. -
At the top of the file, import the following packages:
- Add the async
productsfunction, which awaits the data returned frombigcommerce.get. You can view index.ts (GitHub). Theproductsfunction calls thegetSessionfunction to retrieve the session’s access token and store hash.
Create a custom hook
To consume the Products endpoint, create a custom React hook using SWR.
-
In the
libfolder, create ahooks.tsfile. -
At the top of the file, import the
useSWRReact hook from SWR anduseSessionfrom Context.
- Declare the
fetcherfunction.
The fetcher function accepts the API URL and returns data asynchronously.
- Export the
useProductsfunction. You can view hooks.ts (GitHub).
useSWR accepts two arguments: the API URL and the fetcher function. The fetcher function takes the /api/products URL passed in from the useProduct function. The useProducts function destructures the data returned by the useSWR hook.
Create a header component
-
In the app’s root directory, create a
componentsfolder. -
In the
components folder, create aheader.tsxfile. -
Import
BoxandLinkcomponents from BigDesign.
- Define the
Headerfunctional component. You can view header.tsx (GitHub).
Update the homepage
-
In the
pagesfolder, open theindex.tsxfile. -
At the top of the file, replace the existing import with the following:
- Update the
Indexfunctional component. You can view index.tsx (GitHub).
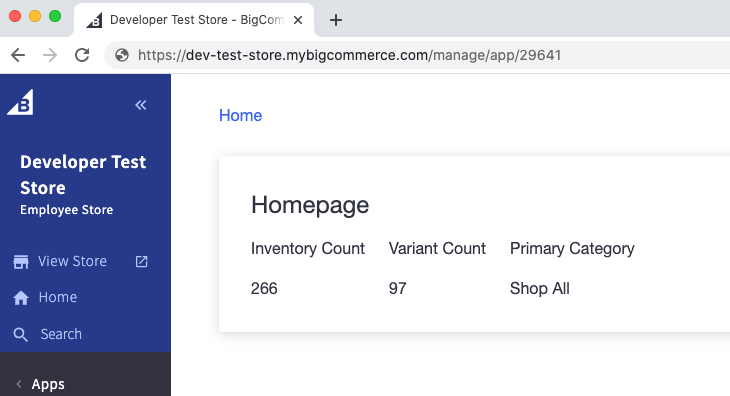
summary creates the Flex component with three Box components inside of it. inventory_count, variant_count, and primary_category_name are populated with data returned from calling the /catalog/summary endpoint added in Add the Products endpoint.
For the complete list of properties returned by the /catalog/summary endpoint, see Get a Catalog Summary.
Update the user interface
-
In the root of the pages folder, open the
_app.tsxfile. -
Import the
BoxandHeadercomponents.
- Import
SessionProviderfrom Context.
Your updated import statements should resemble the following:
- For Context to properly propagate, we need to wrap
<Component {...pageProps} />with the ContextSessionProvider. This ensures that each page has access to the React Context.
- Add a
Boxcomponent and place theHeaderandSessionProvidercomponents inside it. You can view _app.tsx (GitHub).
-
In the root of the
pagesfolder, openindex.tsx. -
Import the
Headercomponent. You can view index.tsx (GitHub).
Test your app
Now that you have synced up the database, your app should display information under Inventory Count, Variant Count, and Primary Category fields.