

Custom Templates
The Stencil framework allows theme developers and merchants to assign custom layout templates to storefront pages of the following types:
- Brand
- Category
- Product
- Web page
You must create and bundle custom templates using Stencil CLI before uploading the theme to a storefront.
However, once you have created and uploaded templates, authorized store users or apps with appropriate permissions can assign them to storefront pages through the control panel.
Authoring a Custom Template
To test custom templates locally, you must know the URL of the page that you wish to test. First, identify the URL for a product in your store (i.e. /test-url/). Then create the custom subdirectory in the templates/pages directory, and the four required subdirectories inside of it (brand, category, product, page). Creating these subdirectories will result in the following directory paths:
- templates/pages/custom/brand
- templates/pages/custom/category
- templates/pages/custom/product
- templates/pages/custom/page
Next, create the template HTML files, and then place them in the appropriate templates/pages/custom/ subdirectories corresponding to the types listed above.
File permissions required
Be sure to set permission 755 (drwxr-x-r-x) on any new subdirectories that you add. Also, be sure to set permission 644 (rw-r-r-) on any new files that you add.
Without these permissions, running your theme locally will fail with multiple error messages. Bundling your theme will also fail, blocking its upload to a store.
Local Mapping and Testing
To test your custom templates locally, you must edit your .stencil or config.stencil.json file (if using Stencil V3.1 release or later) to create mappings between each local template and a corresponding URL.
Within the config.stencil.json file, look for the following section:
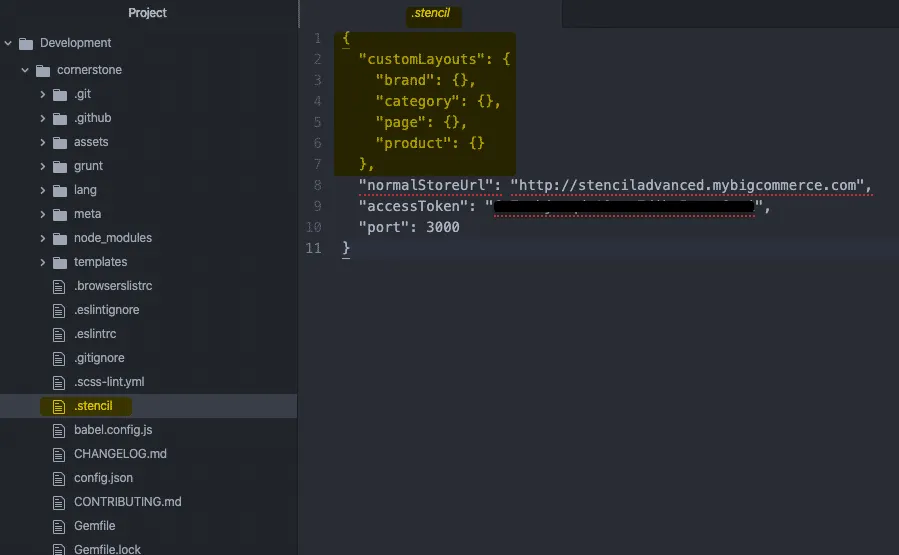
In this section, you would populate keys to create mappings. As a simple example, assume that you have a product custom template named alternate-product.html, and you want to see that template locally at the URL:
http://localhost:3000/test-url/
In this case, you must populate the product key as follows:
BEST PRACTICE: Always test locally and once uploaded to the store remember to test all devices i.e. mobile, tablets, etc. The Stencil CLI enables developers to locally develop and customize on any Stencil theme with no impact on a merchant’s live storefront during the development process. When developing locally, developers have access to real-time Browsersync preview and testing across desktop, mobile and tablet devices/viewports.
Expanded Mapping
Example
Here is a more-complete example in which the brand, page, and category keys are also populated:
Mapping Requirements and Options
The requirements and options for the config.stencil.json mapping examples above are as follows:
- Each mapped URL must be a URL for a brand, category, product, or static page that is already configured in the store. This means that you cannot insert a placeholder URL that is an arbitrary string of letters, such as /abcdefghijklmnop/
- Each URL’s trailing slash is optional
- The HTML files must reside in either the brand, category, product or page subdirectories
- Use URL encoding for special characters in URLs
- After editing your config.stencil.json files, you must restart stencil to see your changes locally
- Enter stencil start on the command line, appending any appropriate option for your workflow (e.g.: stencil start -n)
Why These URL Requirements?
When you create a local custom template page for products, you expect that page to have access to all Stencil product objects. However, the server cannot readily determine the page type of each local custom template. So we give it a hint by instructing the server to look at the page type of the URL where you mapped the template.
In the above config.stencil.json configuration example’s final entry, the server will look at the URL /custom-category/ within the store, deduce that the page type is category, and return a category context to Stencil CLI. This allows Stencil CLI to properly display the page in the browser when you visit http://localhost:3000/custom-category/ locally, or when shoppers visit the corresponding public store page.
Mapping Multiple URLs
Beyond the single URL mapped to each template in the above examples, you have the option of mapping an array of URLs to each template. This is shown in the following example for the product template:
Specifying Custom Front Matter
You can specify front matter on a custom template by injecting data into the front matter of a generic template first, then the custom template will inherit it.
For example:
- Create a file at templates/custom/brand/custom-brand.html
- Copy the content of templates/pages/brand.html into the new file
- Add the following to the front matter of the custom template:
- Add the following somewhere in the custom template’s HTML:
- Map the custom template to a brand page URL in config.stencil.json
- Run stencil start
- Add something to the cart, then navigate to the brand page URL. Note the following output from the HTML/Handlebars:
- Move the front matter declaration from step 3 into the front matter in templates/pages/brand.html
- Refresh the storefront and observe the output. Note that the cart object is displayed on the page
Applying Custom Templates to Pages Refresh
When you are ready, you can bundle and push the theme to your BigCommerce store.
Once the developer has uploaded a theme to BigCommerce, the merchant (or other authorized store user) can assign the custom templates to individual store pages in the BigCommerce Control Panel in order to make it live on the storefront.
Bundle and Push
The stencil push command is available only for themes that you have successfully initialized using a Stencil CLI token (with Themes: modify scope). This command bundles your theme and uploads it to the associated store, in one continuous process.
For further requirements and usage details, please see the Command-Line Upload in Pushing Your Theme.
For file-size error diagnostics and workarounds, please Check/Adjust Zipfile’s Size.