

Lab - Configure API Credentials and Channel
Preparing for Your Storefront Integration
The BigCommerce APIs are the linchpin of your front-end’s integration with the platform, so the first step for your development journey is to generate the appropriate access credentials to allow your application to access those APIs. We’ll be generating two types of credentials: Store-level v2/v3 API account credentials and a GraphQL Storefront API token.
The credentials you generate in this lab will be needed for future labs, so make sure you store them securely.
Prerequisites
- A BigCommerce sandbox store or trial store, or a full production store, with an available slot for a new storefront channel
- Postman or a similar API client
In this lab, you will:
- Practice generating store-level v2/v3 API credentials
- Create a headless storefront channel
- Practice generating a GraphQL storefront token with Postman
- Generate and store the credentials you will use in subsequent labs
Enable Multi-Storefront
If you are using a BigCommerce store for which you’ve already created a Catalyst channel in Introduction to Catalyst, you will need to ensure that Multi-Storefront is enabled in order to create the additional channel in this exercise.
- In your BigCommerce store control panel, navigate to Channel Manager.
- Click the “Create channel” button.
- If you don’t already have the ability to create new storefront slots, an “Enable storefront seats” button will appear in the Storefronts section. Click this button.
You will be presented with a prompt to confirm or update to the various requirements for Multi-Storefront.
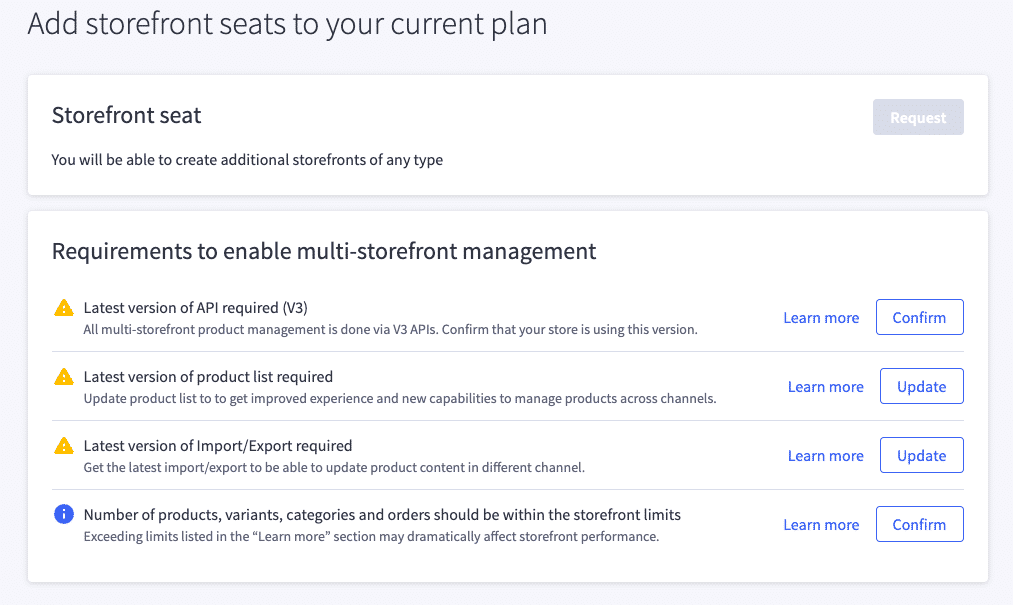
- Confirm or update each item in the requirements list.
- Exit the channel creation process. (You won’t be creating a storefront channel via the control panel.)
Create a Store-Level API Account
- In your BigCommerce store control panel, under Settings, navigate to “Store-level API accounts” and create a new “V3/V3 API token” account with the following scopes.
The OAuth scopes we’ve set will be used both for storefront operations and management of store data. This is convenient for a development-only context, but when configuring API accounts for a real store, you should restrict the scopes available to your front-end application. Create one account with the “Customers login” and “Carts” scopes, and a separate account for management.
After saving your API account, you will be presented with three values in a modal:
- Client ID
- Client Secret
- Access token
These values will not be retrievable once the displayed modal is closed!
- Securely store the access token for your API account. Optionally, you may also store the client ID and client secret.
The following steps will involve using a Postman environment to store your access token for API requests. While you are unlikely to use the client ID and client secret within Postman, such environment variables can be a convenient central place to secure all related credentials. Since we’ll be using Postman in future labs, feel free to store your credentials there now. (Make sure the environment you create is not in a shared workspace!)
Create a Headless Storefront Channel
While you will use the default storefront of your BigCommerce store for redirected checkout in subsequent labs, we’re going to create a separate, dedicated channel for your headless storefront itself.
- Create a new Postman environment with the following variables.
- Create a Postman collection and give it an appropriate name, such as “BC Composable Storefronts Intermediate.”
- Create a new “Create Headless Channel” HTTP request and save it to your collection. This request requires the following details.
- In the Headers tab, use the Presets drop-down to Manage Presets, then add a header preset with the following values, saving it with a name like “BC REST.”
Make sure to enter “{{store_hash}} and {{v3_token}} exactly as they appear. These are references to the environment variables you created and will inject their values.
- Select your newly created header preset to populate headers.
- In the Body tab, select “raw” as the body type and “JSON” from the list of formats. Enter the following body, replacing
namewith a storefront name of your choice.
Do not send the request just yet, as we will first add tests and logic to store the ID of the new channel.
- In the Script tab, enter the following “Post-response” value:
These tests will ensure that the channel has been successfully created by examining the response for the channel ID.
- Add the following after the previous code in the Scripts tab.
This will store the ID of the new channel permanently in an environment variable alongside your other configuration details.
- Save the request, make sure you have selected your BigCommerce environment in the environment drop-down, then send the request and observe the results.
- Send the request and verify that the tests pass in the “Test Results” tab of the response panel.
- Verify that the
storefront_channel_idvariable is populated in your environment variables list.
If your request succeeded but any issue with your Tests scripts caused storefront_channel_id not to be stored, you can either delete the channel in Channel Manager in your BigCommerce control panel and try the request again after correcting the issue (which will require a different channel name), or else use the Get All Channels API endpoint to retrieve the new channel’s information and save storefront_channel_id manually.
Verify Your Channel Site
- Create a new HTTP request and save it in your collection with the name “Get Channel Site.”
- Set the same configuration that was used for the previous request for Authorization and Headers (using your previously created preset).
- Set the request method as “GET.”
- Set the following as the URL of the request:
- Send the request and observe the response. Verify that your channel contains a “canonical” URL value with the pattern
https://store-{hash}-{channel ID}.mybigcommerce.com. This is the URL that will be used for GraphQL Storefront API requests. - Observe the
checkoutURL in the response, which should be set to the URL of your default BigCommerce storefront. This is the configuration you’ll keep for your Redirected Checkout flow in your dev environment.
It’s not actually the recommended practice to redirect to the default storefront for checkout. The checkout URL should be a domain that is assigned directly to the headless storefront channel. For the purposes of development in these lab exercises, however, you do not have a real domain to set.
Your channel does not yet have a “primary” URL, and while working with the channel in a local development environment, you will not have a public domain to set. The main implication of this will be that BigCommerce will not know how to properly generate links to your local headless storefront in your control panel or in Stencil pages like checkout.
In a full build, once you have a public domain and a strategy for checkout domain, you can update these with the following API endpoints:
- Update a Channel Site
- Upsert a Site’s Checkout URL
Create a Private Token
Your storefront application’s primary interactions with BigCommerce will use the GraphQL Storefront API. For server-to-server use (including the Next.js app in the next lab), you need a Private Token. Create your Private Token now and store it in private_storefront_token.
Private Tokens are a new token type designed specifically for server-to-server use. They are the recommended approach for headless storefronts and server-side integrations.
- Create a new “Create Private Token” HTTP request and save it to your collection.
- Set the same configuration that was used for the previous Create a Channel request, including the HTTP method, Authorization, Headers (using your previously created preset), and Body type.
- Set the request URL to:
- Enter the following body:
Remember that you can also use a dynamic value for expires_at, by including a Pre-request Script to calculate a timestamp and store it as an environment or collection variable.
- In the Scripts tab, add the following “post-response” value.
- Send the request and verify that the tests pass in the “Test Results” tab of the response panel.
- Verify that the
private_storefront_tokenvariable is populated in your environment variables list. You will use this token (asBIGCOMMERCE_STOREFRONT_TOKEN) in the Next.js app in the next lab.
Assign Catalog Data
Remember that existing catalog data in your store, if it exists, will not automatically be associated with your new channel. You must create a unique category tree for the channel and assign products.
- Log into your BigCommerce store control panel.
- In Products > Product Categories, create a category tree for your new channel.

- Create two or more top-level categories, making sure to assign them to the appropriate channel.
- If you have existing products in your store that you want to use on your headless channel, visit Products > View and check the checkboxes next to all products you want to assign.
- Use the bulk actions at the top of the product list to Add to Channels. Select your headless channel and Add.
- Add your products to categories within your headless channel’s category tree. You can use the Add to Categories bulk action as appropriate, for each group of products you wish to add to a particular category.
If you prefer to create new products for use in your headless channel, subsequent labs will outline the necessary fields you will want to include for the features you’ll be building.
Configure Shipping and Payments
If you want to be able to complete checkout on your Catalyst storefront, you’ll need to make sure you have the appropriate minimal store configuration in place for shipping and payments.
This step is not channel-specific, so if you’ve previously configured shipping and payment options for your store, you won’t need to do any additional setup.
We won’t walk through the details of configuring your store settings, but make sure you have:
- A Shipping Zone that applies to any billing address you will use at checkout
- An enabled Shipping Method on the Shipping Zone
- An enabled test/sandbox Payment Method. (Check the “Enable test credit card payments” option in your Payments Methods settings for the simplest option.)