> This page is for Developer.
> For clean Markdown of any page, append .md to the page URL.
> For a complete documentation index, see https://docs.bigcommerce.com/llms.txt.
> For AI client integration (Claude Code, Cursor, etc.), connect to the MCP server at https://docs.bigcommerce.com/_mcp/server.
# Installing a Custom Order Confirmation Page
You can engage with your customers after purchase with a custom order confirmation page even if you are not using a custom checkout. This article outlines how to package a custom order confirmation file, and install a custom confirmation file via the control panel.
The installation process is the same as [Installing a Custom Checkout](/developer/docs/admin/checkout-and-cart/open-checkout), except you will modify a different [file](https://github.com/bigcommerce/checkout-js/blob/bdcca1d202287d2e66fb98da68eedd1755a431c6/packages/core/src/app/order/OrderConfirmation/OrderConfirmation.tsx) in [Open Source Checkout](https://github.com/bigcommerce/checkout-js).
## Generate the JavaScript loader file
Generating a loader file is the first step in installing a custom order confirmation page. If you are creating a custom checkout and a custom order confirmation page using checkout-js, the generated loader file is the same for both. However, you can install a custom order confirmation page and still use the default checkout.
The loader file must be responsible for the following:
* Loading all the required assets, including CSS files
* Running the app
### Packaging custom order confirmation page with Open Source Checkout
If using Open Source Checkout, you can generate the loader file by following these steps:
1. Navigate and locate the Open Source Checkout folder using the terminal, and run `npm ci` to download dependencies.
2. Run `npm run build` to generate a `/dist/` folder with all the files.
You can deploy and [install the custom confirmation page](#installing-a-custom-order-confirmation-page) when using Open Source Checkout to view changes and test implementations through the UI.
### Properties available on the custom order confirmation page
When a store uses a custom confirmation page, the following properties are attached to the `window.checkoutConfig` object on the checkout page:
* `containerId`: ID of the HTML component where you load the checkout app.
* `orderId`: The generated order ID.
* `publicPath`: If present, the public URL of the custom checkout file's directory.
To use the data exposed in the window object, include relevant code in your loader file. The following is an example of the relevant code:
**`Include code in loader file`**
```jsx title="Include code in loader file" showLineNumbers={false}
ReactDOM.render(
,
document.getElementById(window.checkoutConfig.containerId)
);
```
## Hosting a custom order confirmation page
You will need to host the custom confirmation file online so it can be served by the store using an external hosting service. Using an external host will allow you the freedom to automate the build process if you wish and push updates automatically from your local machine.
### Using WebDAV to host a custom order confirmation page
You can upload a custom order confirmation page to your store's server using WebDAV. The instructions to upload the `/dist` folder to the BigCommerce server using WebDav are below:
1. Before proceeding, ensure you have downloaded [Cyberduck](https://cyberduck.io/), our recommended WebDAV client.
2. From your store control panel, navigate to **Server Settings** > **File Access (WebDAV)**.
* To automatically connect with Cyberduck, see [Single-click Login](https://support.bigcommerce.com/s/article/File-Access-WebDAV#login).
* To manually connect with Cyberduck, see [Connecting with Cyberduck Manually](https://support.bigcommerce.com/s/article/File-Access-WebDAV#manual).
3. From Cyberduck, enter the `/content` folder and create a new folder named *OrderConfirmation*.
4. Navigate into the `/dist` folder in your OrderConfirmation project.
5. Copy the contents of the `/dist` folder and paste it into the *OrderConfirmation* folder.
> **Note**
>
> For more information on how to use Cyberduck, refer to the [File Access (WebDAV)](https://support.bigcommerce.com/s/article/File-Access-WebDAV) page.
## Installing a custom order confirmation page
You can install a custom checkout on a store in the following two ways:
* [Install using the control panel](#install-using-the-control-panel)
* [Install using the V3 Checkout API](#install-using-the-V3-checkout-API)
### Install using the control panel
To install a custom order confirmation page on a store, follow these steps:
1. Navigate to **Advanced Settings > Checkout** in your store's control panel.
2. Under **Custom Order Confirmation**, type the following in the **Script URL** field, replacing `version` with the latest version number generated by running the `npm run release:alpha` command:
> **Note**
>
> `webdav:checkout/auto-loader-.js`
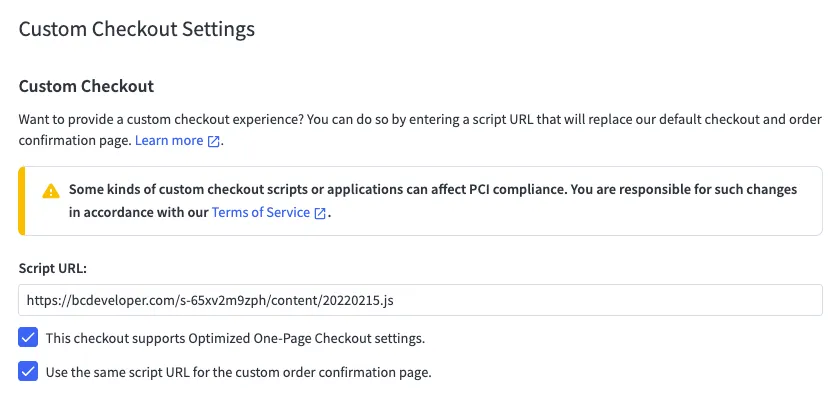
> **Note**
>
> * Prepending `webdav:` Indicates that the URL is in the remote WebDAV directory. It will treat `/content` as the root WebDAV directory.
> * It is important to include `` number in the Script URL field. Because if you make changes to the same provided loader filename, you could serve a cached version to the user.
> * If you previously created a custom checkout, use the same Script URL. You may need to enter the Script URL again.
1. Click the **Save** button at the bottom of the page.
2. Navigate to your live storefront to view your new custom order confirmation page.
### Install using the V3 Checkout API
To install a custom checkout on a store, use the [Update Checkout Settings](/developer/api-reference/rest/admin/management/checkouts/settings/update-checkout-settings) endpoint to install the loader file.
#### Implementing localization
You can customize your checkout page and customer order confirmation page to display in any one language of your choice. To localize your checkout, download and extract your Stencil theme. Navigate to the `/lang` subfolder, which includes the [`en.json`](https://github.com/bigcommerce/cornerstone/tree/master/lang) English language file. Create a new translation file (i.e., `es.json`) and copy the content of the translation file across from [checkout.js](https://github.com/bigcommerce/checkout-js/blob/master/packages/locale/src/translations/en.json) into Cornerstone. Use `{{lang checkout.my-string}}` or `{{lang order-confirmation.my-string}}` and enter the key-value pairs. The example below shows English and Spanish strings.
In `en.json`, add `checkout` key and corresponding information for the value.
```json showLineNumbers={false}
"checkout": {
"title": "Checkout"
}
```
In `es.json`, add the same `checkout` key and the Spanish translation of the value.
```json showLineNumbers={false}
"checkout": {
"title": "Pago"
}
```
For more details on how to add translation keys to a language file, see the [Localization Tutorial](/developer/docs/storefront/stencil/themes/localization/tutorial).
## Related resources
### Articles
* [Checkout SDK](/developer/docs/admin/checkout-and-cart/checkout-sdk)
* [File Access (WebDav)](https://support.bigcommerce.com/s/article/File-Access-WebDAV)
* [Installing Custom Checkouts in the Control Panel](https://support.bigcommerce.com/s/blog-article/aAn4O000000CdFGSA0/installing-custom-checkouts-in-the-control-panel)