> This page is for Developer.
> For clean Markdown of any page, append .md to the page URL.
> For a complete documentation index, see https://docs.bigcommerce.com/llms.txt.
> For AI client integration (Claude Code, Cursor, etc.), connect to the MCP server at https://docs.bigcommerce.com/_mcp/server.
# Using Custom Fonts and Icons
> **Note**
>
> #### Custom fonts unavailable on Page Builder
>
> * BigCommerce widgets come with a list of pre-defined fonts and do not support custom fonts at this time.
> * Third-party widgets can support any font available in the theme. To learn more about third-party widgets, see [Third-Party Widgets](/developer/docs/storefront/stencil/content/widgets).
## Applying custom fonts
There are two paths to take for using custom fonts. They are as follows:
* Change to a new Google Font
* Use a custom font
### Google Fonts
[Google Fonts](https://fonts.google.com/) are a collection of open-source fonts available for use. The base Cornerstone theme uses Karla and Montserrat. Google Fonts come included in the Cornerstone theme.
You can update the fonts in `config.json`; make sure to follow the `Google_FontName_Weight` format.
```json showLineNumbers={false}
//old
{
"body-font": "Google_Karla_400"
}
//new
{
"body-font": "Google_Lato_700"
}
```
> **Note**
>
> #### Check with your theme developer
>
> If you are using a different theme, please check with the theme developer on using Google Fonts.
### Custom fonts
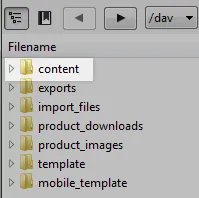
Custom fonts can be used in any theme. To use a custom font upload it to the stores `/content/` folder in [WebDAV](https://support.bigcommerce.com/s/article/File-Access-WebDAV).
### Reference fonts in head
Next, edit the appropriate template file's `` sections to reference your custom fonts. In this logo example, you would edit the `templates/layout/base.html` file's `` section to insert the following code (which references the custom font you just uploaded):
```handlebars showLineNumbers={false}
```
For all possible browser support use the following:
```handlebars showLineNumbers={false}
```
### Update the CSS
Finally, update the appropriate CSS to reference the same font. In this example, you would edit the `assets/scss/layouts/header/_header.scss` file to change the header font.
```css showLineNumbers={false}
.header-logo-text {
display: block;
font-family: 'MyFont';
[...]
}
```
> **Note**
>
> #### CDN Handlebars
>
> The CDN custom Handlebars helper assumes WebDAV's default `/content/` folder, so there is no need to specify that folder.
> Fonts staged via WebDAV, as in the above example, will not show up in the local version of your theme.
Files that do not contain font-overriding CSS code will use the CSS settings in the `config.json` file.
## Sass stylesheet support for theme fonts
To support Page Builder, your theme's Sass stylesheet must call [Stencil's custom Sass functions](/developer/docs/storefront/stencil/themes/style/sass) to transform fonts specified in the theme's `config.json` file. You must call these functions on each `config.json` font key whose value you want to make available to Sass variables.
The default Stencil theme includes these function calls in the following stylesheet
```
{theme-name}/assets/scss/settings/foundation/type/_settings.scss
```
If your theme relies on a Sass framework other than Foundation, the relevant stylesheet will be a different SCSS file name within `{theme-name}/assets/scss/`.
### How to enable fonts for Page Builder
Assume that your theme's `config.json` contains the following key name and value (the details of both are arbitrary, but the key name must end in `-font`, and the value must follow a defined format):
```json showLineNumbers={false}
{
// ...
"headings-font": "Google_Open+Sans_700"
// ...
}
```
In your Sass stylesheet, you would call the `stencilFontFamily` and `stencilFontWeight` custom Sass functions on the corresponding `config.json` key name like so:
```scss showLineNumbers={false}
$body-font-family: stencilFontFamily("body-font");
$body-font-weight: stencilFontWeight("body-font");
```
These functions would extract the corresponding `config.json` values as:
```scss showLineNumbers={false}
$body-font-family: 'Open Sans';
$body-font-weight: 700;
```
This transformation allows you to use the `$body-font-family` and `$body-font-weight` variables wherever needed in your theme. If a merchant uses Theme Editor to select a different font family and/or weight, the variables will propagate the change throughout your theme.
## Applying custom icons
### Installing Grunt
Some of a Stencil theme's static assets are handled with the Grunt JavaScript automator, where required. This means that you have some dependencies on both Grunt and npm. To get started:
First, make sure you have Grunt installed globally on your machine:
`npm install -g grunt-cli`
Then, from your theme's root directory, run:
`npm install`
### Calling theme icons
A Stencil theme's icons are delivered via a single SVG sprite, which is embedded on the page in `/templates/layout/base.html`. This sprite is generated via the Grunt task `grunt svgstore`.
The task takes individual SVG files for each icon (in the theme's `assets/icons/` subdirectory) and bundles them together, to be inlined on the top of the theme, inside a Handlebars partial.
You can then call each icon in a similar way to an inline image via the following HTML:
``
The ID of each SVG icon you call is based on the filename of the icon you want, with `icon-` prepended.
For example:
`xlink:href="#icon-facebook"`
### Adding new icons
Simply add your new icon SVG file to the `assets/icons/ `folder. Then, from your theme's root directory, run `grunt svgstore` or just `grunt`.
## Resources
### Additional resources
* [Stencil Custom Sass Functions](/developer/docs/storefront/stencil/themes/style/sass)
* [Custom Icons Video Tutorial (BigCommerce YouTube)](https://youtube.com/watch?v=ZwrVN5QrEZY)
* [Custom Fonts Video Tutorial (BigCommerce YouTube)](https://youtube.com/watch/-w7Hbn_p_pw)
* [Google Fonts (Google)](https://fonts.google.com/)