> This page is for Developer.
> For clean Markdown of any page, append .md to the page URL.
> For a complete documentation index, see https://docs.bigcommerce.com/llms.txt.
> For AI client integration (Claude Code, Cursor, etc.), connect to the MCP server at https://docs.bigcommerce.com/_mcp/server.
# Catalyst + B2B Buyer Portal
> Experimental guide to integrating the B2B Edition Buyer Portal with a Catalyst storefront, including running the Buyer Portal locally.
This guide shows how to enable the B2B Edition Buyer Portal, a client-side rendered React application, on a Catalyst storefront. It also covers running the open-source Buyer Portal locally, so you can customize the experience inside the Buyer Portal.
> **Warning**
>
> **Experimental:** The B2B Edition integration with Catalyst is experimental and subject to change. Work with BigCommerce professional services to implement it.
This implementation primarily handles authentication with the B2B Storefront API and triggering the render of the Buyer Portal on top of Catalyst. It is similar to the experience currently available for BigCommerce's Stencil storefront framework.
To integrate directly into Catalyst's routes and components instead, use [B2B Edition's APIs](/developer/docs/b2b-edition/storefront/graphql-storefront-api).
> **Info**
>
> Using the default B2B Edition implementation with Catalyst requires support for Customer Access Tokens (CAT). All new B2B Edition stores support this functionality by default. If your store had B2B Edition prior to July 2025, you must contact support to enable this feature.
## Prerequisites
See [B2B Buyer Portal Setup Overview](/developer/docs/b2b-edition/storefront/buyer-portal) for general prerequisites. You need a V3 BigCommerce API token with the B2B Edition scope.
See [Prerequisites](/developer/docs/storefront/catalyst/getting-started/prerequisites) for Catalyst prerequisites.
You also need:
* Multi-storefront enabled in the BigCommerce store and in B2B Edition
## Create the project
### Create and configure the storefront channel
1. If you have not yet created a Catalyst storefront channel, create one as described in [Getting Started](/developer/docs/storefront/catalyst/getting-started).
> **Info**
>
> The initial deployed preview storefront does not support B2B Buyer Portal features. You must follow the remaining steps and deploy your storefront to your own hosting to enable the Buyer Portal.
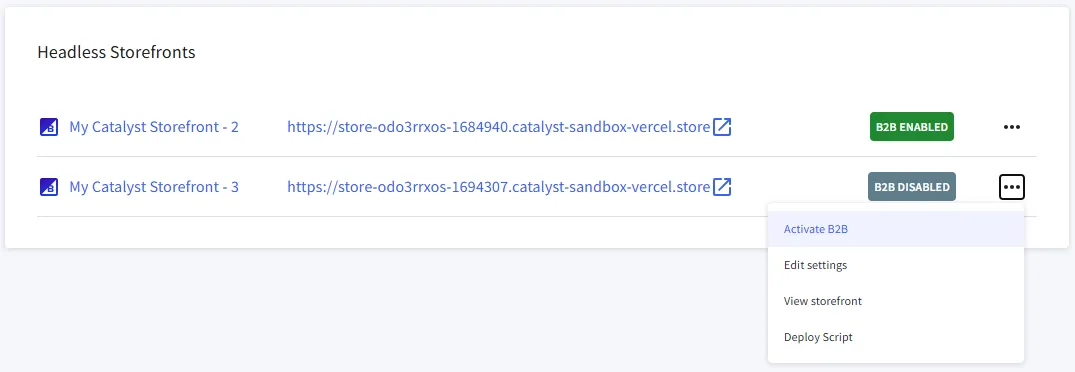
2. In the B2B Edition dashboard, navigate to Storefronts and click the ellipsis (...) next to your Catalyst Headless Storefront Channel. Click “Enable B2B” and ensure the channel updates to “B2B Enabled.”
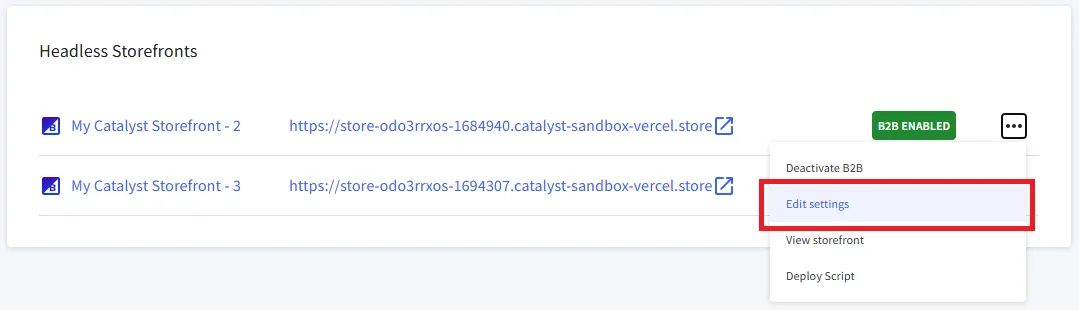
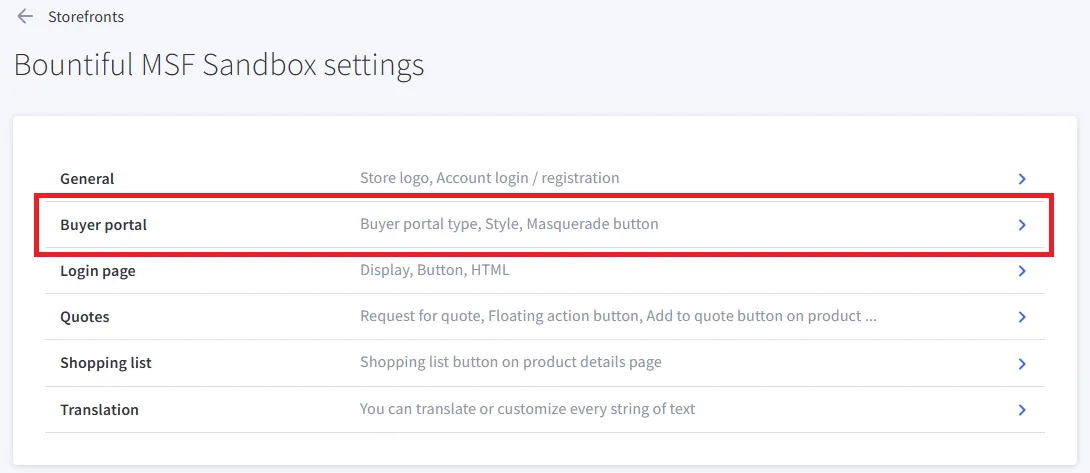
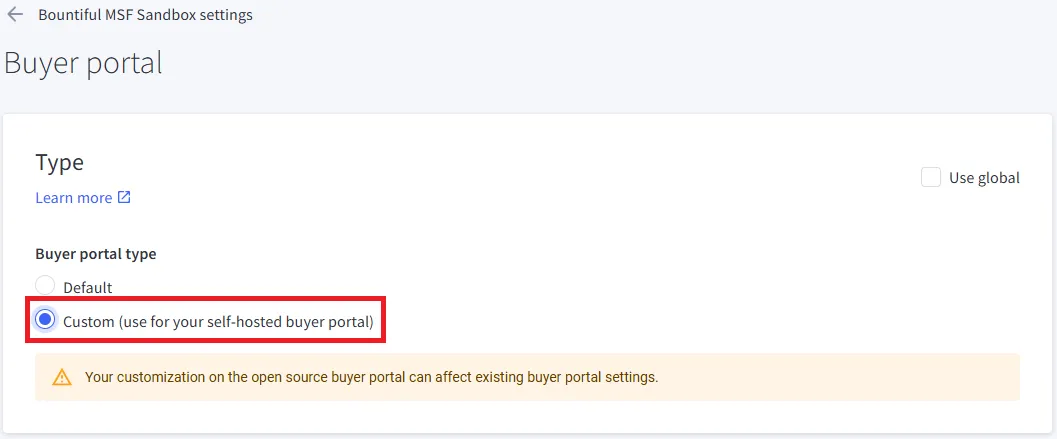
3. Also in the Storefronts section of the dashboard, navigate to “Edit settings” for the storefront, select “Buyer portal” settings, and set “Buyer portal type” to “Custom.”
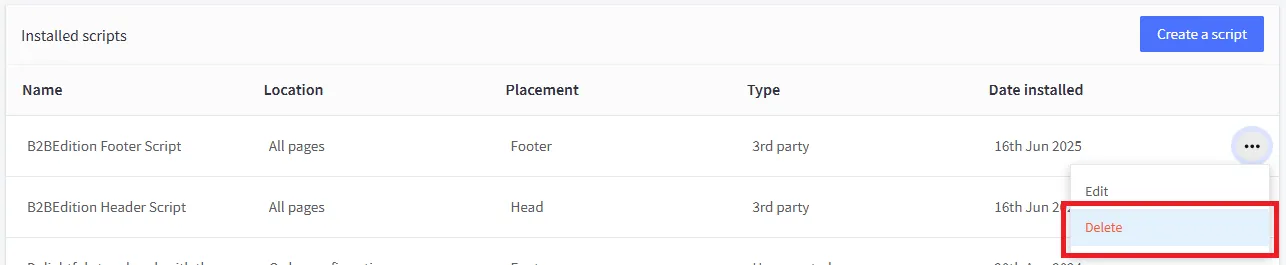
4. In the store control panel, navigate to Channels and select your Catalyst storefront channel. In the “Script manager” panel, delete the “B2BEdition Footer Script” and “B2BEdition Header Script.”
### Install Catalyst locally
Creating a B2B-enabled Catalyst storefront follows the [CLI Installation](/developer/docs/storefront/catalyst/getting-started/cli-installation) workflow, but starts from a different Git tag and has a few extra steps.
1. Run the Catalyst CLI installer with the appropriate `gh-ref` for including B2B:
```bash showLineNumbers={false}
pnpm create @bigcommerce/catalyst@latest --gh-ref @bigcommerce/catalyst-b2b-makeswift@latest
```
2. Supply a name for the project and respond to the interactive prompts to connect to your previously created storefront.
3. Add the following variables to `.env.local`:
| Var | Value |
| :------------------------- | :--------------------------------------- |
| `B2B_API_HOST` | `https://api-b2b.bigcommerce.com` |
| `BIGCOMMERCE_ACCESS_TOKEN` | Your V3 token with the B2B Edition scope |
4. Run the following from the project root to start the local server:
```bash showLineNumbers={false}
pnpm run dev
```
5. Push your project to a remote Git repository, as described in [Push to a remote repository](/developer/docs/storefront/catalyst/getting-started/cli-installation#push-to-a-remote-repository).
## Fork and run the Buyer Portal
By default, Catalyst is integrated with the hosted version of the B2B Buyer Portal.
For developing and deploying your own custom Buyer Portal, Catalyst has built-in support for the loader scripts described in the [Headless Guide](https://github.com/bigcommerce/b2b-buyer-portal/blob/main/docs/headless.md) in the B2B Buyer Portal repository, which can be activated by the use of environment variables.
Catalyst and the Buyer Portal are separate applications, each with their own source control.
### Clone and run the Buyer Portal
1. Clone the [B2B Buyer Portal](https://github.com/bigcommerce/b2b-buyer-portal) repository.
2. Install dependencies:
```bash showLineNumbers={false}
yarn install
```
3. Copy `apps/storefront/.env-example` as `apps/storefront/.env`.
4. In `.env`, update the value of `VITE_B2B_URL` to the public BigCommerce B2B API:
**`.env`**
```text showLineNumbers={false} title=".env"
VITE_B2B_URL=https://api-b2b.bigcommerce.com
```
5. Start the development server:
```bash showLineNumbers={false}
yarn dev
```
While the development server is running, it serves the Buyer Portal loader files from a local URL (usually `localhost:3001`). Don't browse to this URL directly; the next step points your storefront at this local server.
### Update Catalyst
The local Catalyst project must be configured to load the custom Buyer Portal instead of the hosted version.
In the Catalyst project:
1. Set the following variable in `.env.local` with the appropriate port where the Buyer Portal is running.
`LOCAL_BUYER_PORTAL_HOST=http://localhost:3001`
2. Restart the Catalyst dev server.
The Buyer Portal in your local Catalyst storefront now reflects any customizations you make in your Buyer Portal project.
## Deploy with a custom Buyer Portal
When you're ready to take your custom Buyer Portal to your production storefront, build and deploy the Buyer Portal files.
You can deploy the Buyer Portal static files with a CDN or through your BigCommerce store's WebDAV. This guide deploys them with the Catalyst storefront itself.
These steps also invalidate static file caches with a date-based subdirectory. Where the process differs if you use Buyer Portal build hashes instead, the steps say so.
For the following steps, you must know in advance the URL where your build files will be deployed. (For example, `https://my-catalyst-store.com/b2b/20260101/`.)
### Set up the Catalyst project
Follow the steps in this section once in your Catalyst project. They enable a “custom production” loader for the Buyer Portal and exclude any URLs beginning with `/b2b/` from the Next.js proxy.
1. Modify `proxy.ts` to exclude `/b2b/` URLs from the proxy by adding `b2b/.*` to the existing regular expression in the first `config.matcher` entry. Keep the other entries, including `'/api/ucp/:path*'`, which the [UCP proxy](/developer/docs/storefront/catalyst/development/middleware#with-ucp-proxy) needs. For example:
```ts showLineNumbers={false}
export const config = {
matcher: [
'/((?!b2b/.*|api|admin|_next/static|_next/image|_vercel|favicon.ico|xmlsitemap.php|sitemap.xml|robots.txt).*)',
'/api/ucp/:path*',
],
};
```
2. Add a new loader file at `b2b/script-production-custom.tsx` with the following contents:
```ts showLineNumbers={false}
'use client';
import Script from 'next/script';
import { useB2BAuth } from './use-b2b-auth';
import { useB2BCart } from './use-b2b-cart';
/**
* Use these vars if using build hashes in B2B Buyer Portal files.
*/
const hashIndex = null;
const hashIndexLegacy = null;
const hashPolyfills = null;
interface Props {
storeHash: string;
channelId: string;
token?: string;
cartId?: string | null;
prodUrl: string;
bcGraphqlDomain?: string;
}
export function ScriptProductionCustom({
cartId,
storeHash,
channelId,
token,
prodUrl,
bcGraphqlDomain,
}: Props) {
useB2BAuth(token);
useB2BCart(cartId);
return (
<>
);
}
```
3. In `b2b/loader.tsx`, add the import of `ScriptProductionCustom` and update `EnvironmentSchema` and the constants at the beginning of `B2BLoader` as shown. Only the highlighted lines are new: `LOCAL_BUYER_PORTAL_HOST` and `STAGING_B2B_CDN_ORIGIN` already exist in the file and are shown for context.
```ts {2, 7, 15} showLineNumbers={false}
...
import { ScriptProductionCustom } from './script-production-custom';
const EnvironmentSchema = z.object({
...
LOCAL_BUYER_PORTAL_HOST: z.string().url().optional(),
PROD_BUYER_PORTAL_BASE_URL: z.string().url().optional(),
STAGING_B2B_CDN_ORIGIN: z.string().optional(),
});
export async function B2BLoader() {
const {
...
LOCAL_BUYER_PORTAL_HOST,
PROD_BUYER_PORTAL_BASE_URL,
STAGING_B2B_CDN_ORIGIN,
} = EnvironmentSchema.parse(process.env);
...
}
```
4. Also in `b2b/loader.tsx`, add a new conditional block after the one for `LOCAL_BUYER_PORTAL_HOST`, as shown below:
```ts showLineNumbers={false}
export async function B2BLoader() {
...
if (LOCAL_BUYER_PORTAL_HOST) {
...
}
if (PROD_BUYER_PORTAL_BASE_URL) {
return (
);
}
...
}
```
With these modifications in place, the Buyer Portal files injected into your Catalyst storefront will be loaded from the URL set in `PROD_BUYER_PORTAL_BASE_URL`, if it exists.
### Build the Buyer Portal
Follow the remaining steps whenever you publish new changes to your custom Buyer Portal.
1. Set values in `.env` appropriately for building.
| Var | Value |
| :-------------------------- | :----------------------------------------------------------------------------------------------------------------------------------------------------------------------------------------------------------------------------------------------------------------------- |
| `VITE_IS_LOCAL_ENVIRONMENT` | `FALSE` |
| `VITE_ASSETS_ABSOLUTE_PATH` | The absolute URL where the build files will be deployed. Make sure to include the trailing slash. This guide assumes deployment in a date-based subdirectory of the Catalyst project’s `public` directory, for a URL like: `https://my-catalyst-store.com/b2b/20260101/` |
| `VITE_DISABLE_BUILD_HASH` | `TRUE` NOTE: If you wish to handle static file cache invalidation with build hashes in file names (for example, `index.{hash}.js`) instead of with a subdirectory, leave this variable unset. Any non-empty value, including `FALSE`, disables the hashes. |
2. Run the build.
```bash showLineNumbers={false}
yarn build
```
> **Warning**
>
> When rebuilding and redeploying your custom Buyer Portal, if only `.env` variables have changed, clear the local contents of `.turbo/cache` before running `yarn build` so the build reflects all updated code.
### Deploy the build files with Catalyst
1. Copy the contents of `apps/storefront/dist` from the Buyer Portal project into a date-based subdirectory like `public/b2b/20260101.`
2. Deploy the Catalyst project.
As an example for how the URLs of the final build files should be represented, consider that the Buyer Portal `dist` directory should contain these two files/subdirectories (among others):\
`assets`\
`index.js`
After you copy them into the `public` subdirectory shown above and deploy Catalyst, you get URLs like:\
`https://my-catalyst-store.com/b2b/20260101/assets`\
`https://my-catalyst-store.com/b2b/20260101/index.js`
A new subdirectory for each deployment leaves older deployments in place. The previous Buyer Portal version keeps rendering until you activate the new deployment in the next step, and you can revert by pointing back to an older subdirectory.
> **Info**
>
> If you include build hashes in your Buyer Portal file names, also update the hash constants in `b2b/script-production-custom.tsx`. You'll likely use a fixed location for the build files, such as `public/b2b`, rather than a new subdirectory each time.
### Load the deployed Buyer Portal
In the local Catalyst project, take the following steps in `.env.local` to test with the deployed Buyer Portal:
1. Comment out `LOCAL_BUYER_PORTAL_HOST`.
2. Add `PROD_BUYER_PORTAL_BASE_URL` with the base URL of the Buyer Portal build files. For example:
`PROD_BUYER_PORTAL_BASE_URL=https://my-catalyst-store.com/b2b/20260101`
When you’re ready to activate your new Buyer Portal deployment in production, set the same `PROD_BUYER_PORTAL_BASE_URL` environment variable in your Catalyst hosting environment and re-deploy.
If you use build hashes in your Buyer Portal file names for cache invalidation, you'll likely use a permanent base URL for your build files, so you don't need to update `PROD_BUYER_PORTAL_BASE_URL` on each deployment.
## Next steps
* [Deploy your Catalyst storefront](/developer/docs/storefront/catalyst/deployment/overview) with `PROD_BUYER_PORTAL_BASE_URL` set in your hosting environment.
* To build B2B features into Catalyst's own routes and components instead of the Buyer Portal, see [B2B Edition's APIs](/developer/docs/b2b-edition/storefront/graphql-storefront-api).