> This page is for Developer.
> For clean Markdown of any page, append .md to the page URL.
> For a complete documentation index, see https://docs.bigcommerce.com/llms.txt.
> For AI client integration (Claude Code, Cursor, etc.), connect to the MCP server at https://docs.bigcommerce.com/_mcp/server.
# Create and Place a Widget
BigCommerce's [Widgets API](/developer/docs/admin/widgets-and-scripts) allows you to create, manage, and apply widgets to your storefront.
In this tutorial, you will create a [widget](https://raw.githubusercontent.com/bigcommerce/dev-docs/master/assets/images/widgets-tutorial-01.gif) (GitHub) that displays a row of three images and place that widget in a designated region on a category page of BigCommerce's [Cornerstone](https://github.com/bigcommerce/cornerstone) theme.
### Prerequisites
* [A BigCommerce store](https://support.bigcommerce.com/s/article/Starting-a-Bigcommerce-Trial).
* API `access_token` with `content modify` scope.
* Knowledge of the [Widgets API](/developer/docs/admin/widgets-and-scripts).
To edit and preview theme files locally, we recommend using [Stencil CLI](/developer/docs/storefront/stencil/cli/install), BigCommerce's powerful theme development and deployment tool.
## Create a region
For a widget to appear on a store's page, you have to place it in a region. Regions are added and removed at the file level by editing a page's template.
Let's start by adding a new region called `category_header_banner` to your store's category page template. You will use this region to position your widget later.
In `templates/pages/category.html`, add a new region `{{{region name="category_header_banner"}}}` below the page heading.
```html showLineNumbers={false}
{{#unless theme_settings.hide_category_page_heading }}
{{category.name}}
{{{region name="category_below_header"}}}
{{/unless}}
{{{region name="category_header_banner"}}}
{{{category.description}}}
```
If you are using [Stencil CLI](/developer/docs/storefront/stencil/cli/install) and editing theme files locally, run a `stencil push` command to apply your changes before proceeding to the next step. `stencil push` will bundle your theme into a zip file and upload the zip to BigCommerce. You can find more information on Stencil CLI commands in our [Stencil CLI Option and Commands](/developer/docs/storefront/stencil/cli/options-and-commands) article.
> **Note**
>
> * You can add regions to templates in the [`templates/pages/`](/developer/docs/storefront/stencil/themes/foundations/directory-structure) folder.
> * To edit theme files locally, use [Stencil CLI](/developer/docs/storefront/stencil/cli/install).
> * To edit theme files in the control panel, use [Page Builder](https://support.bigcommerce.com/s/article/Stencil-Themes#edit).
### Verify region creation
To verify region creation, send a `GET` request to [`/v3/content/regions?template_file=pages/category`](/developer/api-reference/rest/admin/content/widgets/regions/get-content-regions). Make sure to specify the `template_file=pages/category` query string parameter to get the category template's regions.
**`Example request: Get theme regions`**
```http title="Example request: Get theme regions" showLineNumbers={false}
GET /stores/{{STORE_HASH}}/v3/content/regions?template_file=pages/category
Host: api.bigcommerce.com
X-Auth-Token: {{ACCESS_TOKEN}}
Accept: application/json
```
Look for the region's name in the response.
**`Example response: Get theme regions`**
```json title="Example response: Get theme regions" showLineNumbers={false}
{
"data": [
{
"name": "header_bottom"
},
{
"name": "category_below_header"
},
{
"name": "category_header_banner"
}
],
"meta": {}
}
```
## Create a widget template
Widgets derive from widget templates. Before you can create a widget, you must first create its template. To do so, send a `POST` request to [`/v3/content/widget-templates`](/developer/api-reference/rest/admin/content/widgets/widget-template/create-widget-template).
**`Example request: Create a widget template`**
```http title="Example request: Create a widget template" showLineNumbers={false}
POST /stores/{{store_hash}}/v3/content/widget-templates
Host: api.bigcommerce.com
X-Auth-Token: {{ACCESS_TOKEN}}
Content-Type: application/json
Accept: application/json
{
"name": "Header Images",
"template": "{{#each images}} {{/each}}"
}
```
**Response:**
**`Example response: Create a widget template`**
```json title="Example response: Create a widget template" showLineNumbers={false}
{
"data": {
"channel_id": 1,
"client_rerender": false,
"current_version_uuid": "c48b131a-ae9d-4767-b5d6-63d9e43bcf75",
"date_created": "2020-11-03T18:51:22.877Z",
"date_modified": "2020-11-03T18:51:22.877Z",
"icon_name": "default",
"kind": "custom",
"name": "Header Images",
"schema": [],
"template": "{{#each images}}{{/each}}",
"uuid": "{your-widget-template-uuid}"
},
"meta": {}
}
```
> **Note**
>
> * Make a note of the `uuid` of the widget template in the response. You will use it to create the widget in the next step.
> * Multiple widgets can use the same widget template.
## Create a widget
To create a widget, use the widget template `uuid` from the previous step. Send a `POST` request to [`/v3/content/widgets`](/developer/api-reference/rest/admin/content/widgets/widget/create-widget) making sure to replace the `widget_template_uuid` placeholder value with your template's `uuid`.
**`Example request: Create a widget`**
```http title="Example request: Create a widget" showLineNumbers={false}
POST /stores/{{STORE_HASH}}/v3/content/widgets
Host: api.bigcommerce.com
X-Auth-Token: {{ACCESS_TOKEN}}
Content-Type: application/json
Accept: application/json
{
"name": "Header Images",
"template": "{{#each images}}{{/each}}",
"widget_configuration": {
"images": [{
"image_source": "https://cdn11.bigcommerce.com/s-n0i50vy/images/stencil/1280x1280/products/109/361/kinfolkessentialissue_1024x1024__22507.1456436715.jpg?c=2&imbypass=on"
},
{
"image_source":"https://cdn11.bigcommerce.com/s-n0i50vy/images/stencil/500x659/products/85/282/livingwithplants_grande__26452.1456436666.jpg?c=2&imbypass=on"
},
{
"image_source":
"https://cdn11.bigcommerce.com/s-n0i50vy/images/stencil/1280x1280/products/109/361/kinfolkessentialissue_1024x1024__22507.1456436715.jpg?c=2&imbypass=on"
}
]
},
"widget_template_uuid":"{your-widget-template-uuid}"
}
```
| Property | Description |
| ---------------------- | ------------------------------------------------------------ |
| `name` | widget name displayed to user (required) |
| `description` | widget description displayed to user (optional) |
| `template` | widget's template; overrides `widget_template_uuid` template |
| `widget_configuration` | data for Handlebars context |
| `widget_template_uuid` | default template `uuid` |
> **Note**
>
> Make a note of the widget's `uuid` in the response. You will use it to create a placement in the next step.
## Create a placement
In the control panel UI, users can drag and drop widgets to place them in a region on a page. For this tutorial, we will use the Widgets API to place the widget programmatically.
To place your widget in the `category_header_banner` region of a category page, send a `POST` request to [`/v3/content/placements`](/developer/api-reference/rest/admin/content/widgets/placement/create-placement).
**`Example request: Create a widget placement`**
```http title="Example request: Create a widget placement" showLineNumbers={false}
POST /stores/{{store_hash}}/v3/content/placements
Host: api.bigcommerce.com
X-Auth-Token: {{ACCESS_TOKEN}}
Content-Type: application/json
Accept: application/json
{
"widget_uuid": "{your-widget-uuid}",
"entity_id": "{your-category-id}",
"sort_order": 1,
"region": "category_header_banner",
"template_file": "pages/category",
"status": "active"
}
```
| Property | Description |
| --------------- | ------------------------------------ |
| `widget_uuid` | UUID of the widget |
| `entity_id` | page, category, brand, or product ID |
| `sort_order` | widget placement order |
| `region` | region to place the widget in |
| `template_file` | template file to target |
| `status` | active or inactive |
`entity_id` depends on the type of page; for example, for product pages, it is the product ID, and for category pages, it is the category ID. To place your widget on a specific category page, you need to provide a category ID. To retrieve available category IDs, send a `GET` request to [`/v3/catalog/categories`](/developer/api-reference/rest/admin/catalog/categories/get-categories). If you omit `entity_id`; the widget will appear on all category pages.
## Create a custom template placement
It is possible to place a widget on a custom template. Just like with other pages, you must first add a region and then create a placement for your widget as described in [Create a region](#create-a-region) and [Create a placement](#create-a-placement) steps, respectively.
In this section, you will create a custom category template which you can then use to place your widget.
1. In the `/templates/pages` folder, create a `/custom/category` folder and add a `custom-category.html` file.
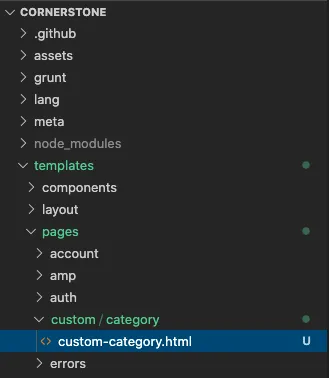
2. Add template content and a new region. (You can copy the content from `category.html`.)
3. Open the `config.stencil.json` file and update the `custom-category.html` property. The URL you define in `config.stencil.json` will be used for category mapping.
**`Example custom template`**
```json title="Example custom template" showLineNumbers={false}
{
"customLayouts": {
"brand": {},
"category": {
"custom-category.html": "/custom-widget-templates/"
},
"page": {},
"product": {}
},
"normalStoreUrl": "{STORE URL}",
"port": "3000"
}
```
If using Stencil CLI, push and apply your changes.
4. To create a new category using the [Catalog API](/developer/api-reference/rest/admin/overview), send a `POST` request to [`/v3/catalog/categories`](/developer/api-reference/rest/admin/catalog/categories/create-category). Use the URL defined in the `config.stencil.json` category mapping. In our example, it is `/custom-widget-templates/`.
**`Example request: Create a category`**
```http title="Example request: Create a category" showLineNumbers={false}
POST /stores/{{store_hash}}/v3/catalog/categories
Host: api.bigcommerce.com
X-Auth-Token: {{ACCESS_TOKEN}}
Content-Type: application/json
Accept: application/json
{
"custom_url": {
"is_customized": false,
"url": "/custom-widget-templates/"
},
"default_product_sort": "use_store_settings",
"description": "
{{/each}}"
}
```
**Response:**
**`Example response: Create a widget template`**
```json title="Example response: Create a widget template" showLineNumbers={false}
{
"data": {
"channel_id": 1,
"client_rerender": false,
"current_version_uuid": "c48b131a-ae9d-4767-b5d6-63d9e43bcf75",
"date_created": "2020-11-03T18:51:22.877Z",
"date_modified": "2020-11-03T18:51:22.877Z",
"icon_name": "default",
"kind": "custom",
"name": "Header Images",
"schema": [],
"template": "{{#each images}}{{/each}}",
"uuid": "{your-widget-template-uuid}"
},
"meta": {}
}
```
> **Note**
>
> * Make a note of the `uuid` of the widget template in the response. You will use it to create the widget in the next step.
> * Multiple widgets can use the same widget template.
## Create a widget
To create a widget, use the widget template `uuid` from the previous step. Send a `POST` request to [`/v3/content/widgets`](/developer/api-reference/rest/admin/content/widgets/widget/create-widget) making sure to replace the `widget_template_uuid` placeholder value with your template's `uuid`.
**`Example request: Create a widget`**
```http title="Example request: Create a widget" showLineNumbers={false}
POST /stores/{{STORE_HASH}}/v3/content/widgets
Host: api.bigcommerce.com
X-Auth-Token: {{ACCESS_TOKEN}}
Content-Type: application/json
Accept: application/json
{
"name": "Header Images",
"template": "{{#each images}}{{/each}}",
"widget_configuration": {
"images": [{
"image_source": "https://cdn11.bigcommerce.com/s-n0i50vy/images/stencil/1280x1280/products/109/361/kinfolkessentialissue_1024x1024__22507.1456436715.jpg?c=2&imbypass=on"
},
{
"image_source":"https://cdn11.bigcommerce.com/s-n0i50vy/images/stencil/500x659/products/85/282/livingwithplants_grande__26452.1456436666.jpg?c=2&imbypass=on"
},
{
"image_source":
"https://cdn11.bigcommerce.com/s-n0i50vy/images/stencil/1280x1280/products/109/361/kinfolkessentialissue_1024x1024__22507.1456436715.jpg?c=2&imbypass=on"
}
]
},
"widget_template_uuid":"{your-widget-template-uuid}"
}
```
| Property | Description |
| ---------------------- | ------------------------------------------------------------ |
| `name` | widget name displayed to user (required) |
| `description` | widget description displayed to user (optional) |
| `template` | widget's template; overrides `widget_template_uuid` template |
| `widget_configuration` | data for Handlebars context |
| `widget_template_uuid` | default template `uuid` |
> **Note**
>
> Make a note of the widget's `uuid` in the response. You will use it to create a placement in the next step.
## Create a placement
In the control panel UI, users can drag and drop widgets to place them in a region on a page. For this tutorial, we will use the Widgets API to place the widget programmatically.
To place your widget in the `category_header_banner` region of a category page, send a `POST` request to [`/v3/content/placements`](/developer/api-reference/rest/admin/content/widgets/placement/create-placement).
**`Example request: Create a widget placement`**
```http title="Example request: Create a widget placement" showLineNumbers={false}
POST /stores/{{store_hash}}/v3/content/placements
Host: api.bigcommerce.com
X-Auth-Token: {{ACCESS_TOKEN}}
Content-Type: application/json
Accept: application/json
{
"widget_uuid": "{your-widget-uuid}",
"entity_id": "{your-category-id}",
"sort_order": 1,
"region": "category_header_banner",
"template_file": "pages/category",
"status": "active"
}
```
| Property | Description |
| --------------- | ------------------------------------ |
| `widget_uuid` | UUID of the widget |
| `entity_id` | page, category, brand, or product ID |
| `sort_order` | widget placement order |
| `region` | region to place the widget in |
| `template_file` | template file to target |
| `status` | active or inactive |
`entity_id` depends on the type of page; for example, for product pages, it is the product ID, and for category pages, it is the category ID. To place your widget on a specific category page, you need to provide a category ID. To retrieve available category IDs, send a `GET` request to [`/v3/catalog/categories`](/developer/api-reference/rest/admin/catalog/categories/get-categories). If you omit `entity_id`; the widget will appear on all category pages.
## Create a custom template placement
It is possible to place a widget on a custom template. Just like with other pages, you must first add a region and then create a placement for your widget as described in [Create a region](#create-a-region) and [Create a placement](#create-a-placement) steps, respectively.
In this section, you will create a custom category template which you can then use to place your widget.
1. In the `/templates/pages` folder, create a `/custom/category` folder and add a `custom-category.html` file.

2. Add template content and a new region. (You can copy the content from `category.html`.)
3. Open the `config.stencil.json` file and update the `custom-category.html` property. The URL you define in `config.stencil.json` will be used for category mapping.
**`Example custom template`**
```json title="Example custom template" showLineNumbers={false}
{
"customLayouts": {
"brand": {},
"category": {
"custom-category.html": "/custom-widget-templates/"
},
"page": {},
"product": {}
},
"normalStoreUrl": "{STORE URL}",
"port": "3000"
}
```
If using Stencil CLI, push and apply your changes.
4. To create a new category using the [Catalog API](/developer/api-reference/rest/admin/overview), send a `POST` request to [`/v3/catalog/categories`](/developer/api-reference/rest/admin/catalog/categories/create-category). Use the URL defined in the `config.stencil.json` category mapping. In our example, it is `/custom-widget-templates/`.
**`Example request: Create a category`**
```http title="Example request: Create a category" showLineNumbers={false}
POST /stores/{{store_hash}}/v3/catalog/categories
Host: api.bigcommerce.com
X-Auth-Token: {{ACCESS_TOKEN}}
Content-Type: application/json
Accept: application/json
{
"custom_url": {
"is_customized": false,
"url": "/custom-widget-templates/"
},
"default_product_sort": "use_store_settings",
"description": "Custom category
",
"is_visible": true,
"layout_file": "custom-category.html",
"name": "Custom Category",
"sort_order": 1,
"parent_id": 0
}
```
5. You can now [create a placement](#create-a-placement) for the widget you created in the previous steps.
## Create a user interface
BigCommerce's [Page Builder](/developer/docs/storefront/stencil/content/page-builder) tool allows you to customize different style elements of your theme in the store's control panel. You can use Page Builder to configure and place widgets onto pages to tailor your storefront. To make your widget compatible with Page Builder, add custom configuration settings to the widget template by including the `schema` property in the [create widget template](#create-a-widget-template) request.
The following is an example of a widget template compatible with Page Builder.
**`Example widget template`**
```json title="Example widget template" showLineNumbers={false}
{
"name":"Header Images",
"template":"{{#each images}} {{/each}}",
"schema":[
{
"type":"array",
"label":"Images",
"id":"images",
"defaultCount":3,
"entryLabel":"Image",
"thumbnail":"imageUrl.src",
"schema":[
{
"type":"tab",
"label":"Content",
"sections":[
{
"settings":[
{
"type":"imageManager",
"id":"imageUrl",
"default":{
"src":"https://cdn11.bigcommerce.com/s-n0i50vy/images/stencil/1280x1280/products/109/361/kinfolkessentialissue_1024x1024__22507.1456436715.jpg?c=2&imbypass=on",
"type":"IMAGE_MANAGER"
}
},
{
"label":"Link",
"type":"input",
"id":"link",
"default":"#"
}
]
}
]
}
]
}
]
}
```
To learn more about Page Builder, see [Page Builder Overview](/developer/docs/storefront/stencil/content/page-builder).
## Related resources
### Articles
* [Page Builder](https://support.bigcommerce.com/s/article/Page-Builder)
* [Widgets Overview](/developer/docs/admin/widgets-and-scripts)
* [Widgets Code Samples](/developer/docs/admin/widgets-and-scripts/examples)
{{/each}}",
"schema":[
{
"type":"array",
"label":"Images",
"id":"images",
"defaultCount":3,
"entryLabel":"Image",
"thumbnail":"imageUrl.src",
"schema":[
{
"type":"tab",
"label":"Content",
"sections":[
{
"settings":[
{
"type":"imageManager",
"id":"imageUrl",
"default":{
"src":"https://cdn11.bigcommerce.com/s-n0i50vy/images/stencil/1280x1280/products/109/361/kinfolkessentialissue_1024x1024__22507.1456436715.jpg?c=2&imbypass=on",
"type":"IMAGE_MANAGER"
}
},
{
"label":"Link",
"type":"input",
"id":"link",
"default":"#"
}
]
}
]
}
]
}
]
}
```
To learn more about Page Builder, see [Page Builder Overview](/developer/docs/storefront/stencil/content/page-builder).
## Related resources
### Articles
* [Page Builder](https://support.bigcommerce.com/s/article/Page-Builder)
* [Widgets Overview](/developer/docs/admin/widgets-and-scripts)
* [Widgets Code Samples](/developer/docs/admin/widgets-and-scripts/examples)